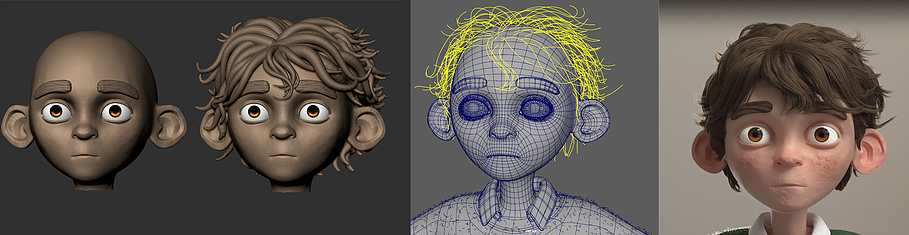
Michael has recently created this beautiful article on grooming using Maya and we asked him to share it with our community. Enjoy it!

Hey guys!
Decided to write another quick little tutorial, this time covering the basic things you should know in order to create (hopefully) good looking grooms for your character in Maya, We will cover 4 different methods fairly briefly before talking about the key considerations to have when creating a groom.
Hope you like it!
There are a few things you should understand about hair before you go trying to create a groom since everything we do in CG has to be based on reality to some extent even if it is stylized.
Strand count.
First off is hair count, obviously the amount of hair on your character has a huge amount of variables including age, gender, their environmental conditions and rather interestingly hair colour also has a correlation with strand count.
Getting exact numbers is obviously very difficult and averages vary depending on what websites you trust but a heavy majority of sources state that on average studies find that young adults have the following strand counts:
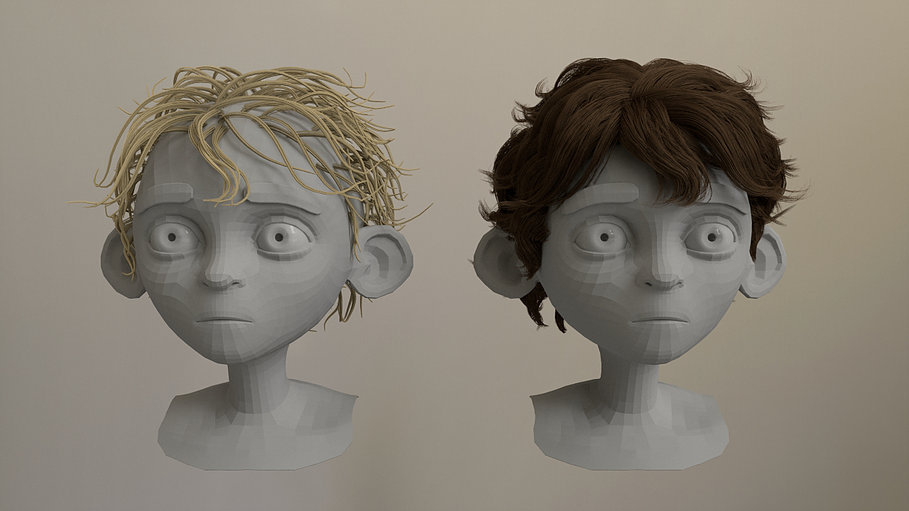
Blondes: 140,000 strands
Brunettes: 108,000 strands
Redheads: 90,000 strands
Yeah sure, these numbers aren't hugely helpful to us however it does give you a pretty good starting point and prevents us from having impossibly dense hair which I have seen quite often in various forums.

Clumping.
I'd argue that this is the most important attribute of hair when creating your groom to create something that feels really convincing. It's really difficult to find any research on why and how hair clumps the way it does - if you exclude research on hair products and oils that "enhance" clumping - so everything i'm gonna say is based on observation and conversations with people in the industry.
First off, the intensity of clumping effects correlate with how dry/oily/wet the hair is so keep this in consideration when shading or thinking about your character, if they haven't showered in a while chances are their hair will have pretty heavy clumping.
The length of the hair can also describe the size of the of the top-level clumping (I'll come back to this in a sec) so basically longer hair forms larger, much more visible clumps and shorter hair produces smaller clumps as you would expect. The reason this is worth remembering is that a vast majority of hairstyles have varied hair length and many typically male hairstyles have shorter hair on the back and sides. You should try to keep all of this on your mind when placing your hair guides, try to make sure the density of guides is higher in these regions.
Second thing to keep in mind is that hairstyles have a very clear hierarchy of clumping and overall structure and every branch in this hierarchy is contained by its parent (apart from strays). By this I mean all the levels of clumping are not isolated, you could image it like this:
Parting - Primary clumps - Sub clumps (number of sub clumps depends on wetness of the hair) - Individual hair strands.
This structure is incredibly important to creating a believable groom for your characters!
Also, very well explained by flipped normals hair sculpting tutorial which has a great breakdown and probably explains this much better than I just did so I heavily recommend viewing it!
Strays.
When creating your hair it's also pretty important to make sure you get stray hairs too unless the style of your character specifically requires perfect hair. Not really much else to say here, just remember to consider having stray hair in your groom :)
Hair is difficult and for me there is no doubt about that, there are so many subtleties and transitions to hair that make creating convincing hairstyles incredibly difficult, so planning is very important here!
Obviously looking for reference is the first thing you need to do like with the rest of everything we do in CG, wigs can sometime be helpful to find as they are often advertised with multiple angles which is sometimes very hard to find with hair.
However, I also highly recommend attempting to sculpt your hairstyle first as this will help you understand the flow of the clumps and this will be very helpful when placing your first guides.
Also, make sure that your base model has good UV's since many workflows require the use of ptex maps to drive attributes and one of the quirks of maya is that the UV's of the model are still required to create ptex... Dunno why, seems odd to me but make sure to have good uvs :)
There are 3 different methods I'll quickly gloss over here before I dive into the fourth method which I personally like to use, to get us started lets talk about the slowest and most painful way I know :)
Manually placing curves.
This method can be used but in my opinion it should probably be avoided. That said, here's the basic workflow.
1) Load you base mesh
2) Create a nurbs curve and place the first CV point on the surface of your mesh
3) Begin to shape your curve into the direction that you want the clump to go
4) Repeat steps 2&3 for every major clump on you character has been defined
5) Now add some extra curves to create your stray hair, still try to follow the flow of your other guides since strays are still somewhat influence by the rest of the hair
6) Attach your hair system and go to sleep, it's been days since you started placing your curves!
One quick tip though, if you really want to use this method consider using Xgen to create the curves and then convert the xgen guides into nurbs curves using the utilities tab. Xgen automatically interpolates new curves and places the base on the mesh so you don't have to spend ages making sure its right. Don't worry about xgen breaking your references either, since you're converting the guides into nurbs you can simply delete the xgen description and keep the nurbs curves.
Painting curves.
This is my personal favorite method for creating long flowing hair and is a pretty quick workflow to get your initial groom set up but it does require a bit of work afterwards to create a real feeling of volume. Anyway, lets get to the workflow.
1) Start off by sculpting a base mesh for your hair style, the method/software you use to do this does not matter as long as the output is a polygonal mesh.
2) Now load your mesh into mudbox to draw curves on the mesh. You can also use maya and paint FX to draw curves on the mesh but I find that mudbox has much more friendly tools for curve creation.
3) Draw curves onto your sculpted mesh, making sure to follow the flow of the clumps you sculpted. Try your best to have a somewhat even distribution of curves. To do this I find it is best to start placing curves at the bottom of the hair mesh and work your way to the top of the scalp layer by layer
4) Export the newly made curves into maya to begin the creation of your hair system
5) Grab the first cv from all your curves and snap them onto the surface of your characters base mesh. The way I like to do this is by making the base mesh a live surface, grab all the first cvs of your curves and scale to snap them to the surface.
6) Modify your curve so that they are not all the same distance from the scalp to give your hair more of a natural feel. Just make sure that the groom doesn't feel like a shell, there's lots of hair behind the strands you see!
Zbrush fibermesh.
One of the lesser know workflows that I am aware about is exporting fibermesh from Zbrush. I don't personally use this method as I don't like the grooming tools presented there but there are plenty of tutorials for fibermesh out there if you want to give this method a try!
1) Load your base mesh into zbrush and mask the area of the scalp in which you want to generate the hair
2) Create the hairstyle you want to make using zbrush's groom toolset. I know I oversimplified this step but I don't use these tools so you'll have to learn them elsewhere, sorry about that.
3) Make sure that the Previsualization slider of the hair to a lower number as each individual fiber will be exported as a nurbs curve.
4) Load these curves into maya and rebuild them using the curves-rebuild tool as by default zbrush fibers have a very high cv count. Then make any adjustments you wish to make.
Step 1: Load your mesh.
Load your mesh into zbrush and select the "Curve tubes" brush (shortcut is BCW).
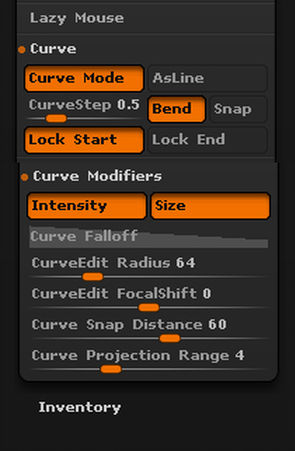
Step 2: Set up your curve brush.
Open up the stroke palette and go to your curve option boxes and set them as seen on the image below as this will make for the easiest method I have found on using curve tubes.
Step 3: Placing your first tubes.
Start by placing tubes at the base of the head and slowly work your way up the head in layers, It is important to work in layers as this insures that every patch of the scalp has some hair coverage as to avoid any bald patches.
It may also be worth sculpting a proxy hair mesh in order to plan out the flow of your clumps.
Also, remember to vary the size of each tube as hair does not clump evenly in real life.
Step 4: Consider the clump hierarchy.
As you get closer to the top/sides/front of the scalp try to have multiple clumps form one larger clump as this is an easy way to fake having multiple layers of clumps and results in a more organic looking groom.
Step 5: Check for gaps and make strays.
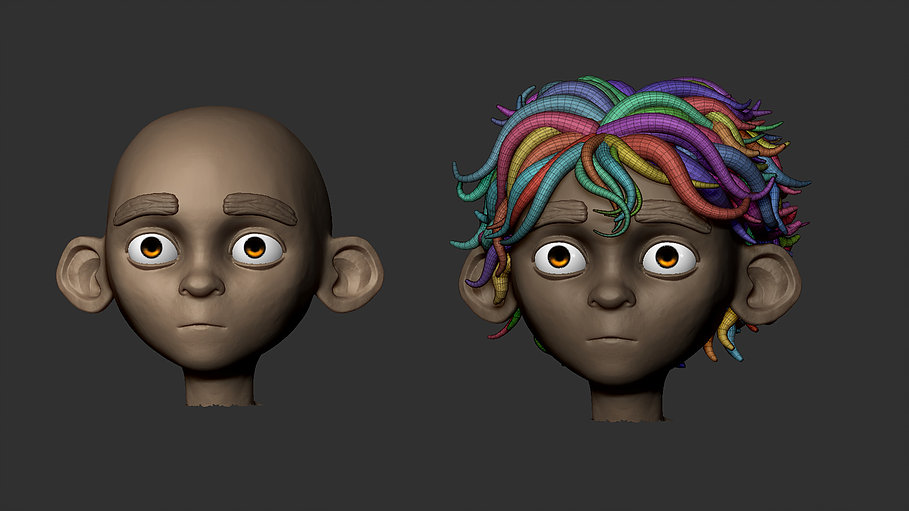
Once you have placed all your main tubes hide the head mesh to check if you have covered the whole scalp (Hiding the mesh makes it much easier to see any gaps) and then start placing secondary curves which can be later used to create stray clumps.
Once you have complete these steps your should have something similar (ish) to the image below.
Step 6: Cleaning your tube geo.
Now that we have our tube guide geometry, export it as an obj into maya so that we can begin the process of converting it into curves on which we can create out hair. Before we can do this however we will need to make our tubes hollow for the following steps to work.
By the I mean that the tubes need to have holes at each end which means you'll have to delete the ends of every curve you made, this would be an absolute nightmare if it wasn't for one simple trick. If you select all of the tube objects and then go into the Mesh-Cleanup tool you can set it to select all quad faces, after doing that you can then invert your select and because of the way the tube meshes are built this will select both of the ends of your tubes (as you can image, this potentially just saved you a fair few hours of work)
Step 7: Converting your geo to nurbs surface.
Now that all of the tubes are hollow we can now begin turning them into curves. Firstly, select all of your tubes and then go into the Modify-convert-Polygon to subdiv. This will likely turn your mesh green as the lambert1 material normally becomes detached after this conversion, now select all the subDiv tubes and go Modify-Convert-Subdiv to Nurbs.
Step 8: Nurbs surface to curves.
This is our final step until we have our final guide curves and there are two methods to do this. First of which is selecting individual isoparms on the nurbs surface and duplicating those into curves, however, this method is incredibly labor intensive and takes a very long time so Generally recommend avoiding this method.
The second workflow to create curves from a nurbs tube is using xgen, as much as I don't like using xgen in a pipline it does have some very helpful utility features. The one we care about is the "surfaces to curves" tool, simply set it to curves start at U=0 to get them to travel along the tube and set the curve number to something like 2 or 3 (depending on the complexity of your set up) and there you go!
Now you have your curves simply delete the xgen collection in the outliner to prevent any future issues caused by xgen and rename your curves.
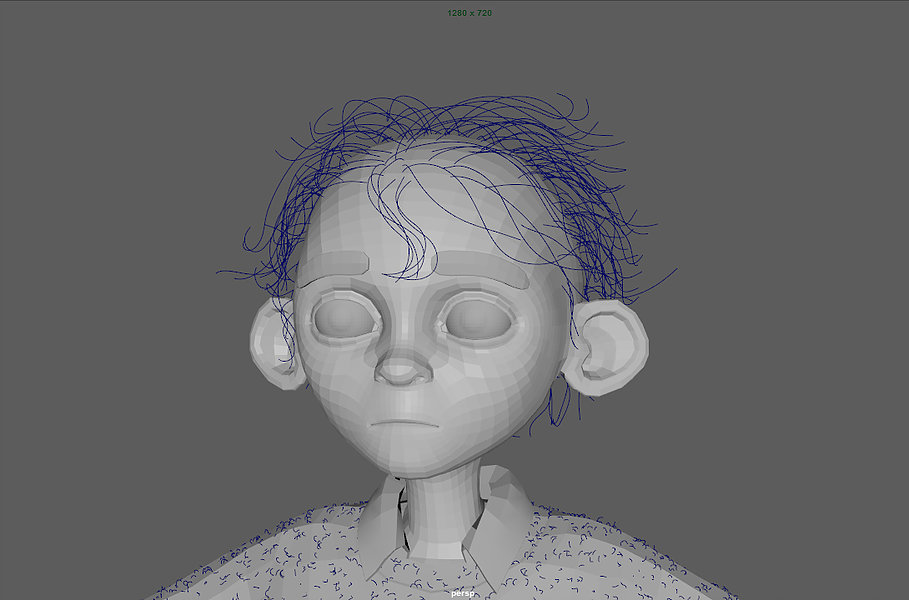
Before we assign a hair system to your curves we must first check the CV count. The quality of your groom and the time taken to simulate dynamics are directly linked to the CV count. If the count is too low the Pfx hair will have sudden angle changes and increasing the "Sub-segments" in the hair system will not always fix this as you can see in this example of my own old work below. (look at the sharp plane change on the front of the hair, this was caused by having not enough CV's in my guide curve)
If you're having this problem detach your hairsystem from the curves, select all of the curves and then use the rebuild curve option in the curves menu.

However, having a CV count that is too high can result in very slow simulation times or very stretchy hair!
Once all of your curves are correctly set up we can start assigning our hair system. This is a super simple process in maya, simply select all of your curves and then go into the FX shelf and go to nhair - assign hair system - new hair system. We now have a hair system but as you can see we have a lot of work left to do so let's get onto the next step.
So we have our default hair and it looks like shit just like you expect. I mean, It would be pretty unfair to to expect anything else considering how much hair varies from person to person.
Obviously, we're gonna need to make some adjustments however this is way too large of a topic for me to be able to tell you exactly how to make appealing hair so what i'll do is just point you to particular settings for you to play with. I have always said that the best way to learn is to simply play about with settings until you find your own way to use them. anyways, onto the settings!
Clump and hair shape: Super basic settings that should always be changed.
Hairs per clump: The density of your hair
Sub segments: The amount of curve interpolation on your hair, the higher the number, the smoother your hair will look.
Thinning: Add variance in the length of each strand of hair
Clump width: The size of each clump of hair generated from your guide curves
Hair width: Erm... well, it's the width of the hair
Clump interpolation: Blends some strands of hair between multiple clumps, Great for strays!
Displacements: the finer adjustment settings that add a more organic feel to your groom
Curl: The amount that a clump of hair twists relative to the guide curve
Noise: Changes the straightness of the hair strands, great for frizzy hair!
Sub Clumping: This one is important! basically this parameter generates multiple levels of sub clumping in the hair you make which as I said earlier it is very important to capture the hierarchy of forms!
When it comes to doing the final tweaks to your groom it is often necessary to use per follicle overrides, what this allows you to do is change density, curl and other dynamics attributes on individual clumps. This is great for things like strays or fringes and other such unique hair features. To perform a follicle override simply select one of the guide curves and search through the attribute tabs for "follicleShape".
To make hair dynamic simply select the guide curves we made for the groom and then go into the nhair menu and use the make selected curves dynamic tool. Make sure you tell it to snap curve base to mesh . If the tip of the guide ends up being snapped to the mesh do not worry, this just means the curve is facing the wrong way, to fix this go into the curves menu and select reverse direction.
So everything I have told you so far is mostly related to the standard workflow with maya hair, you may be thinking of what alternatives you have to this. Well, there is yeti and ornatrix but these can be very expensive, there is also xgen which comes free with maya (2014 onward I believe) which was initially developed by a team at Disney! Great right? well, kinda. There are quite a few pros and cons to xgen which we will get to now:
Pros.
-Amazingly easy workflow
-Guaranteed even coverage of surface (unless you tell it not to be)
-Modifier stack which makes clumping and strays a breeze
-All around much easier to make a VERY nice groom
This is great! but the downsides are also quite considerable
Cons.
- Can not be referenced into maya, this opens a lot of pipeline issues for many people.
- Sometimes unstable patch baking, I have had many occasions where everything has been set up but then I get my renders back and all I have is some floating hair
- VERY picky with naming conventions (kinda ties into the referencing thing)
So as it currently stands, I prefer to avoid using xGen after past experience purely due to the pipeline complications with the lack of referencing however after going to FMX 2016 and speaking to a few autodesk employees face to face I know that referencing is currently one of there top priorities for future xGen development!
I really look forward to this since the moment that is fixed I will probably be switching entirely to xGen in all my future projects, it's just too damn good to ignore!
All that said though, if you're working on a personal project on your own where referencing is not a problem for you. I heavily recommend using xGen!
When it comes to rendering your hair in vray there are a few little things to keep in mind.
First off for rendering, make sure to look at your sample rate render element to see how you AA samples are handeling the hair, hair is infamously tricky for AA so spend some time optimizing your renders as you'll be doing a lot of these!
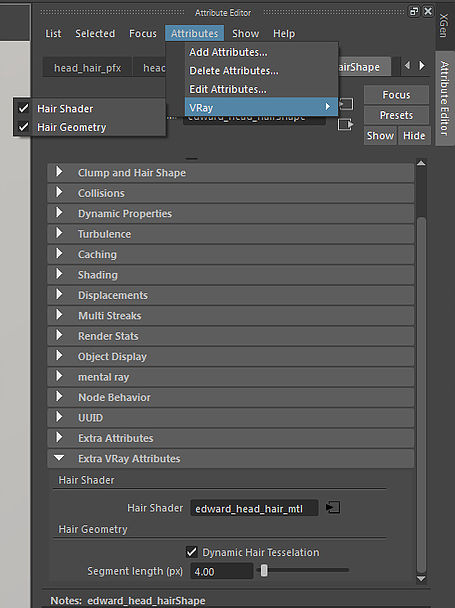
To assign a shader to your hair you can select your hairSystemShape in the attribute editor and add the vray attributes as seen on the image to the right. I also recommend adding dynamic hair tessellation as this improves the resolution of your hair based on camera distance which as you can imagine makes the hair feel much smoother and less fake as a result.
Another incredibly important factor to take into consideration when building the shader for your hair is the lighting in the scene since the transmission value has a very large effect on the appearance of the hair but is also incredibly dependent on your light set-up (So make sure to do lookdev in a similar light setup to the final shots the character will be seen in!)
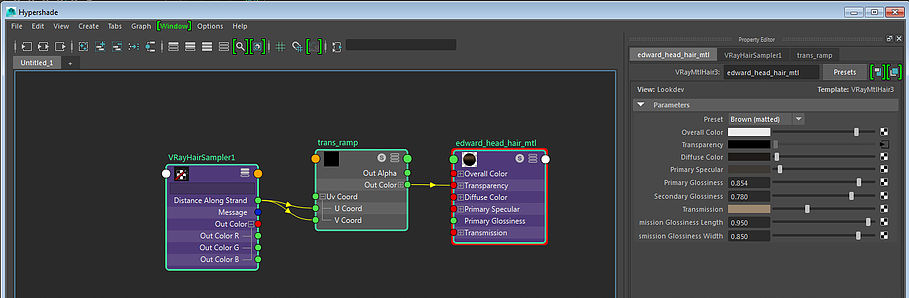
One last tip on the shading for you hair is to learn the VrayHairSampler node as this gives you much more control over the look of the groom by giving you access to information such as the distance along a strand, it also allows you to assign different values per strand of hair which is great for adding natural variance. The best and probably most common use of this node is to map a ramp to the transparency for a strand of hair which allows you to soften the hair towards the tip. This makes the hair feel softer and gives Vrays AA sampler a much easier time.
I really hope you have learnt something while reading this but if you have any specific questions or if something wasn't very clear don't be afraid of contacting me! All my details that you'll need are on the contact page of my site, just send me a message and i'll be more than happy to help :)
Understanding hair style structure and form:
flippednormals.com
Xgen grooming techniques:
hsharktacos.com
youtube.com
gumroad.com
Yeti grooming techniques:
creativebloq.com
Vray hair shading:
chaosgroup.com
docs.chaosgroup.com