Last year trying to get more familiar with the general principles of photography and lighting we read a lot of different articles around the web. In fact we tried to use this knowledge in V-Ray and thus this article was born. I would like to share it with VW community as for us it worked really nice and we hope that you like it!

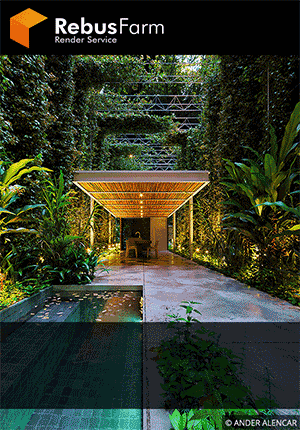
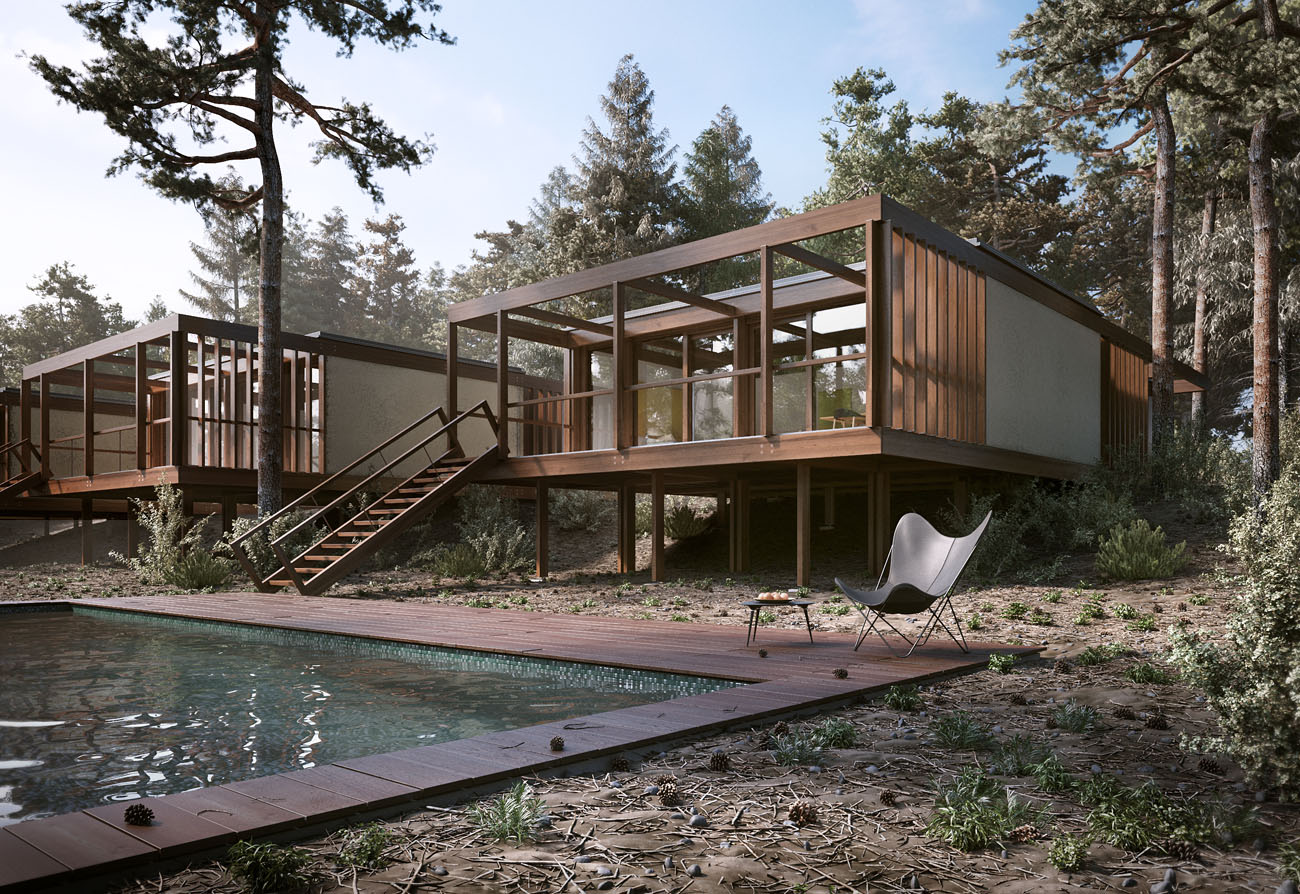
1. Tribu Natal Alu Sofa : 3d model & photography by Vasilis Koutlis.
Enviornment Model: Icube.
It is absolutely essential if we ever want to get beyond click and try for the best result in our 3d scene to learn how to control the EV (Exposure Value). Before explaining EV we could refer the LV (Light Value). Let's say that there are two different levels of light we need to handle in our scene.
The different things we may have in our 3d scene will absorb - reflect - or even block the light and cause shadows. In general this situation will cause objects to appear brighter than others and finally this is exactly what we call Contrast. Below we can see a high contrasted image but really nice!
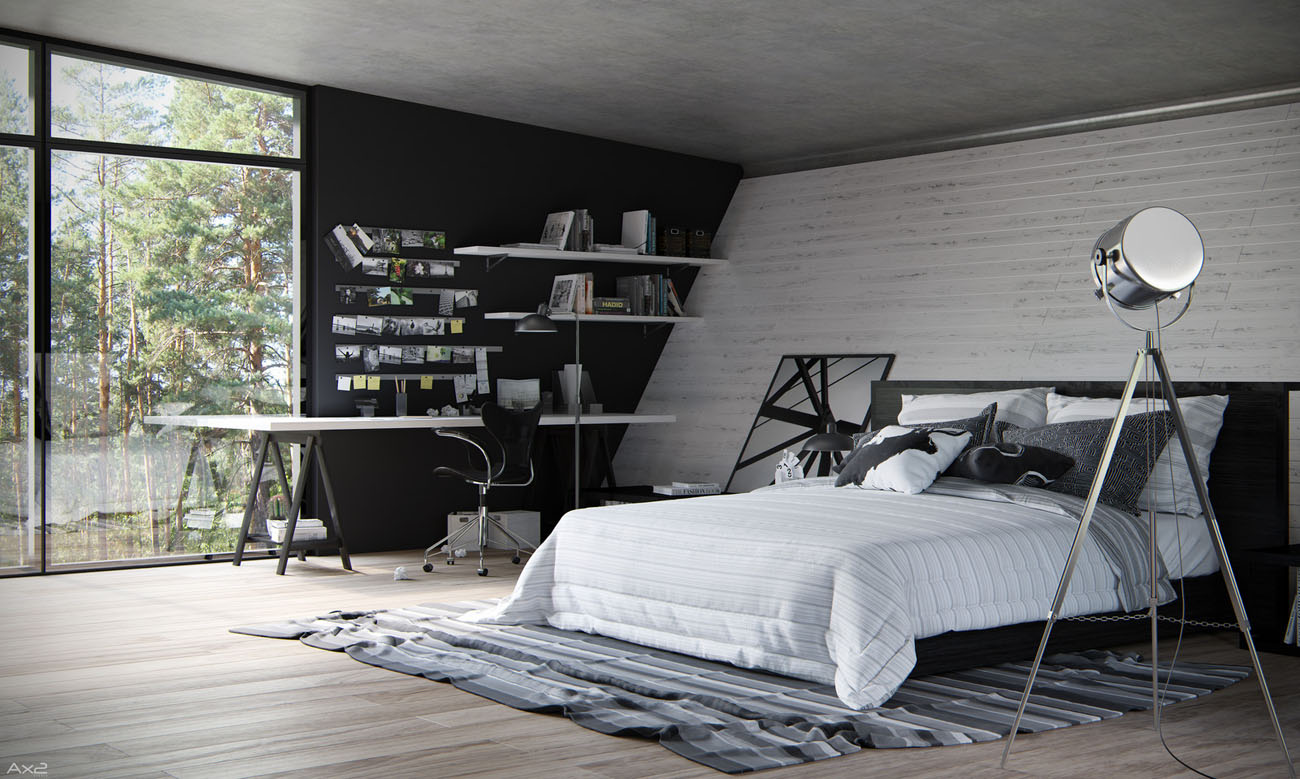
2. Z House: 3d photography by Guilherme Pinheiro.
Image Source: AX2 Studio
The most basic photographic errors come down to allowing in too much light (over-exposure/too bright) or too little (under exposure/too dark).
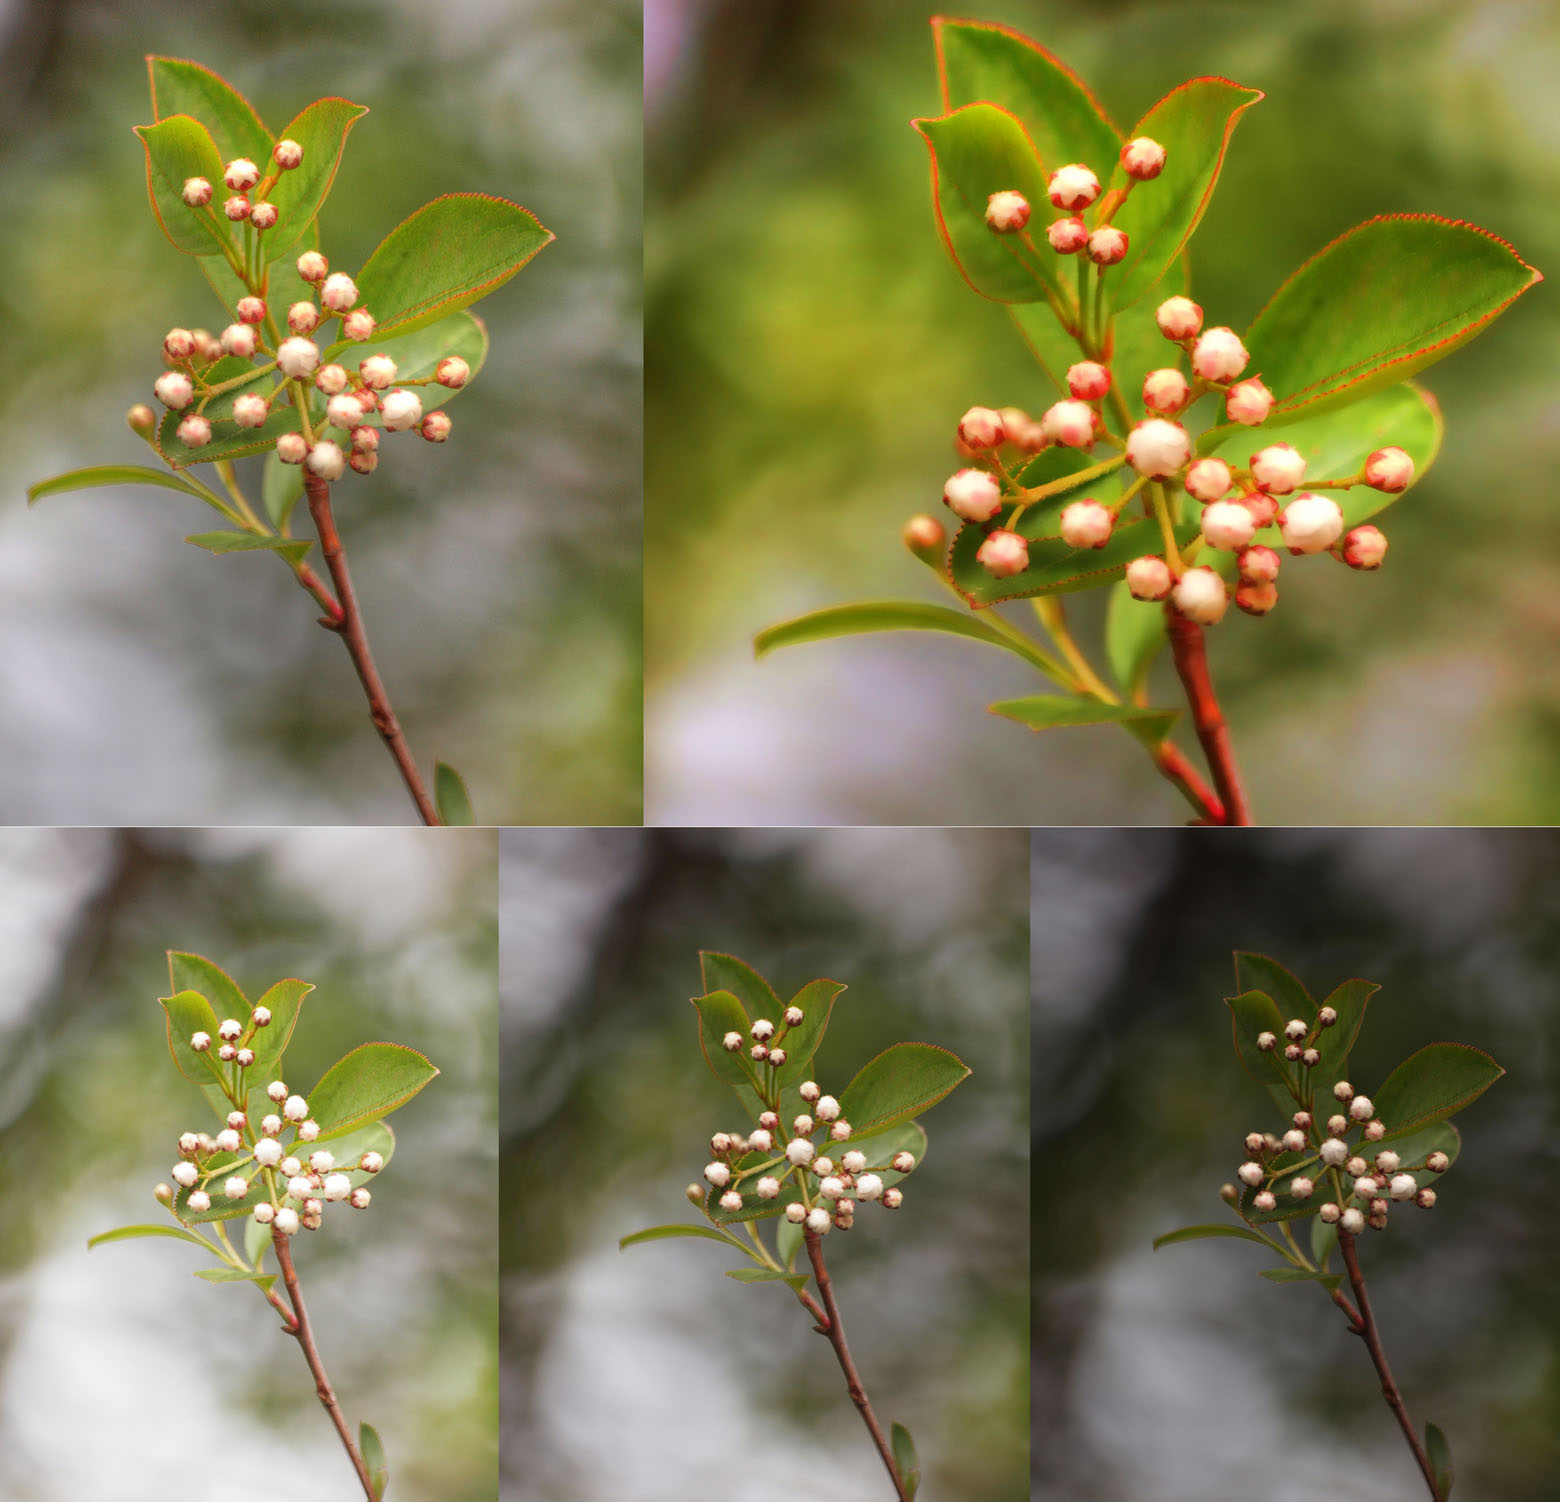
3. Progression of an HDR” captured by Jim Bauer.
Image Source:Flickr
In the bottom row of the photo above, we can see the difference between an overexposed, a properly exposed, and an underexposed image. The top two frames are the same image after a little post production.
The real photographers don't need always to think about all those terrible details and they just aim to shoot according to their style and experience. But what happen with us (3D Photographers) when we have to create an image in a timeframe of hours, days, weeks or even months on personal projects? We just have enough time to take care of dozens different settings. Why not also the EV value?
When our camera takes a picture, shooting at ISO-100, a series of calculations determine what the aperture and shutter speed should be in order for the main subject in that picture to be reproduced as a middle tone of gray. These settings are known as Exposure Value. Exposure often can be determined with reasonable accuracy from tabulated values. Below you can see an interesting table we found on Wikipedia.
Exposure values (ISO 100) for various lighting conditions.
|
Lighting Condition |
EV |
|
Daylight |
|
|
Light sand or snow in full or slightly hazy sunlight (distinct shadows) |
16 |
|
Typical scene in full or slightly hazy sunlight (distinct shadows) |
15 |
|
Typical scene in hazy sunlight (soft shadows) |
14 |
|
Typical scene, cloudy bright (no shadows) |
13 |
|
Typical scene, heavy overcast |
12 |
|
Areas in open shade, clear sunlight |
12 |
|
|
|
|
Outdoor, Natural light |
|
|
Clear sky background |
15 |
|
Cloudy sky background |
14 |
|
Sunsets and skylines |
|
|
Just before sunset |
12–14 |
|
At sunset |
12 |
|
Just after sunset |
9–11 |
|
The Moon, altitude > 40° |
|
|
Full |
15 |
|
Gibbous |
14 |
|
Quarter |
13 |
|
Crescent |
12 |
|
Moonlight, Moon altitude > 40° |
|
|
Full |
−3 to −2 |
|
Gibbous |
−4 |
|
Quarter |
−6 |
|
Aurora borealis and australis |
|
|
Bright |
−4 to −3 |
|
Medium |
−6 to −5 |
|
Milky Way galactic center |
−11 to −9 |
|
Outdoor, Artificial Light |
|
|
Neon and other bright signs |
9–10 |
|
Night sports |
9 |
|
Fires and burning buildings |
9 |
|
Bright street scenes |
8 |
|
Night street scenes and window displays |
7–8 |
|
Night vehicle traffic |
5 |
|
Fairs and amusement parks |
7 |
|
Christmas tree lights |
4–5 |
|
Floodlit buildings, monuments, and fountains |
3–5 |
|
Distant views of lighted buildings |
2 |
|
Indoor, Artificial Light |
|
|
Galleries |
8–11 |
|
Sports events, stage shows, and the like |
8–9 |
|
Circuses, floodlit |
8 |
|
Ice shows, floodlit |
9 |
|
Offices and work areas |
7–8 |
|
Home interiors |
5–7 |
|
Christmas tree lights |
4–5 |
Reciprocity is the law of the relationship between shutter speed and aperture (Perfect exposure settings). Once we have the correct level of light for a perfect exposure we can choose to increase aperture by one stop and trade this off with a doubling of the shutter speed (halving of the shutter duration). Twice and much light coming in for half the time = same amount of light. This allows to retain the same exposure but change either aperture or shutter for artistic or practical reasons.
4. Treevillas: 3d photography by Jacinto Monteiro.
Image Source: Metrocubicodigital.
In addition to this we may wish to over expose or under expose. Understanding the law of reciprocity allows us to do this in a controlled manner, understanding the exposure differences on the image plus the different changes to the depth of field or any motion blur increase or decrease.
One of the most misunderstood terms in beginner photography is “Stop.” Imagine hearing, I need two stops of brightness. Stop up the ISO 200 to 400, stop down the speed and bla bla... Stop is so confusing because it has multiple meanings but the most important thing is that it indicates something which is doubled or halved.
One Stop down means cut in half. Two Stops of light up means four times the amount of light (double then double again). If we need to double the amount of light let into the camera, we “stop up” the light by one stop. If we need to cut the light in half, we “stop down” the light by one stop. Actually there are three main controls on a camera to apply a stop: ISO (sensitivity), Speed, and Aperture and they have one thing in common. Increasing or decreasing each one of these controls we have the effect of doubling or cutting the final light in half.
Aperture is the opening in the camera which allows light in and it’s measured in what’s called f-stops and the numbers are displayed in a series like 1.4, 2, 2.8, 4, 5.6, 8, 11, 16, 22. Just keep in mind that 8 is two stops up from 16 and if we will increase from 8 to 16 then we will have 4times less light! (here a smaller number means a larger opening and more light).
Shutter speed is how fast the aperture opens and closes. So, 1/30 of a second is twice as long as 1/60th of a second (here a smaller number means a slower speed and more light).
ISO is how sensitive the film or sensor on our camera is. It’s commonly measured in 100, 200, 400, 800, etc… Just remember that going from 200 to 400 means 1 stop of light up.
Now, to bring this all together, we know that the shutter speeds and f/stops both double and halve. Thus, we know that we can open up an f/stop (letting in twice the light) and move the shutter speed one step faster (cutting the time in half) and have the same amount of light on the sensor. As an example, if we meter a scene and it tells us that, at our current ISO, speed 1/125th at f/8 is the correct exposure, any of the following combinations would work.
|
Shutter Speed |
1/4 second |
1/8 |
1/15 |
1/30 |
1/60 |
1/125 |
1/250 |
1/500 |
1/1000 |
1/2000 |
1/4000 |
|
f/stop |
f/45 |
f/32 |
f/22 |
f/16 |
f/11 |
f/8 |
f/5.6 |
f/4 |
f/2.8 |
f/2 |
f/1.4 |
But What it's the most important in our effort trying to give a cool lighting condition in our 3d scene? The best trick we could speak about is how we can achieve all this using V-Ray. I know guys that for beginners all those numbers and settings and thoughts are too much complicated... But life is also complicated sometimes :) Nevermind, we can make it easier with an example, so I will try to give you step by step a possible way ;)
First of all we could observe the table above from Wikipedia and see which is the normal EV in our scenario. Let's suppose we need a " Daylight -> Typical scene, heavy overcast". That means we have an EV value of 12 in our environment. The next step is to observe the table below and find a possible correct combination between F Number and Shutter Speed.
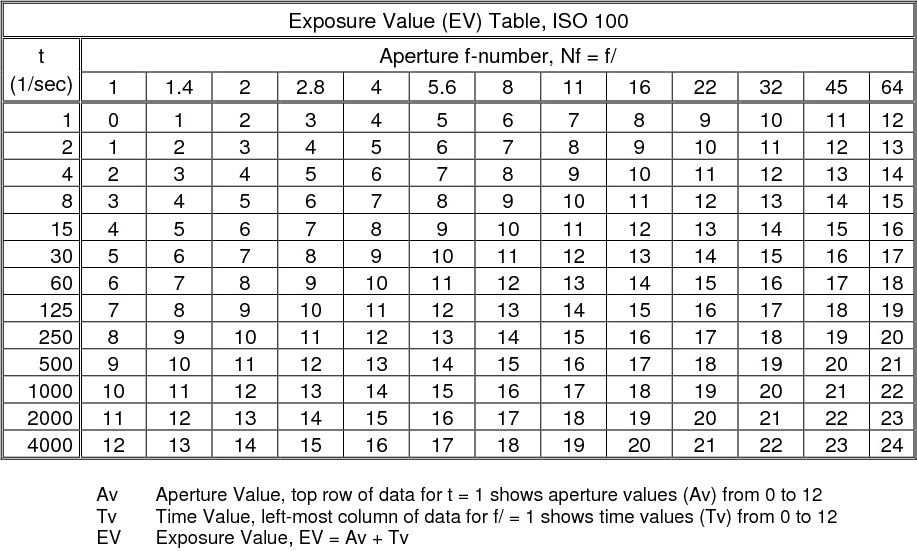
As we see it is possible to use 13 different combinations which give the same amount of light in our scene. Starting from the smallest aperture value of 1 we could use a shutter speed value of 4000 to get an EV of 12. Finishing with the largest aperture value of 64 we could use a shutter speed value of 1 to get an EV of 12. Whatever we will decide to use it has no meaning as the result of the produced image remains the same, except we want to give a depth of field or motion blur effect in our scene ( This will be described in another lesson). I personally prefer medium values, something like F Number 8 and Speed 60.
Then we have to take care about Illumination. As we all know one of the best way to illuminate a 3d scene is Hdri map inside a Dome light. But which Hdri from which company and with what values? It really doesn't matter because almost all the Hdri maps have different exposure and thus we have to test them from scratch. I usually prefer Hdri from CGSource and Peter Guthrie and for this article I used my favorite one 0069-01 from CG Source which works for both interior and exterior scenes as well and finally it could work in our tutorial as we selected a " Daylight -> Typical scene, heavy overcast" scenario.
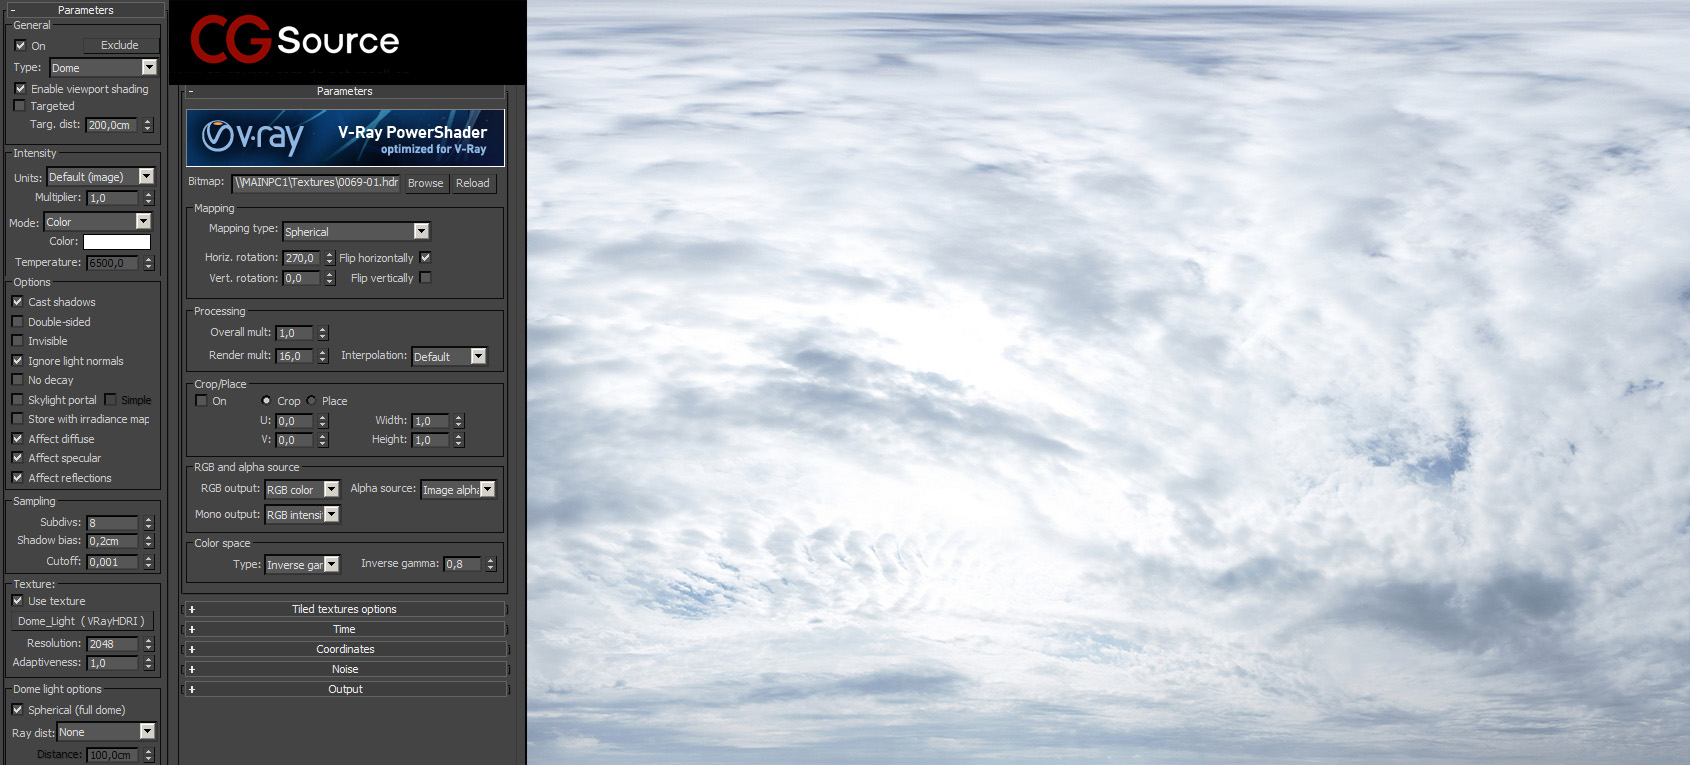
Below we made some test renders by just adjusting Hdri Render Mult: 1.0 -8.0 - 16.0
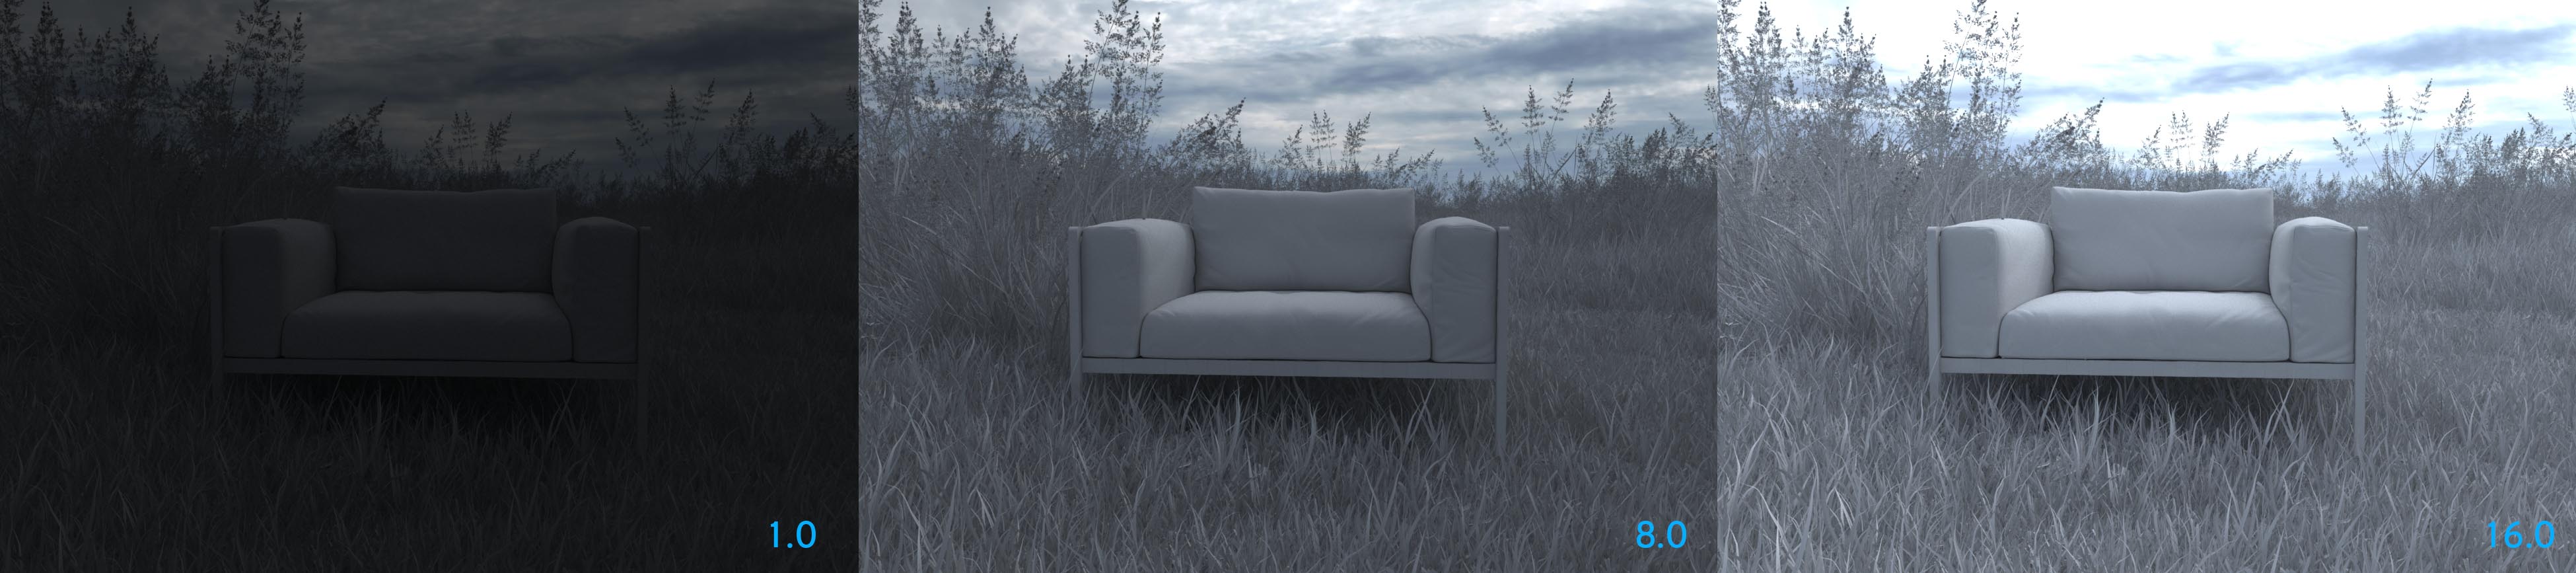
The Test material we used for the overall scene is a medium gray 128 RGB and we worked on a gamma 2.2 because as we mentioned before, when our camera takes a picture a series of calculations determine what the aperture and shutter speed should be in order for the main subject to be reproduced as a middle tone of gray.
The next useful tip that we could follow in case of a better appearance of the sky, something more like 8.0 and less like 16.0 is what I read a few months ago from CG Skies. We could create a second Dome light which is visible in our camera but it does not give any light in the scene.
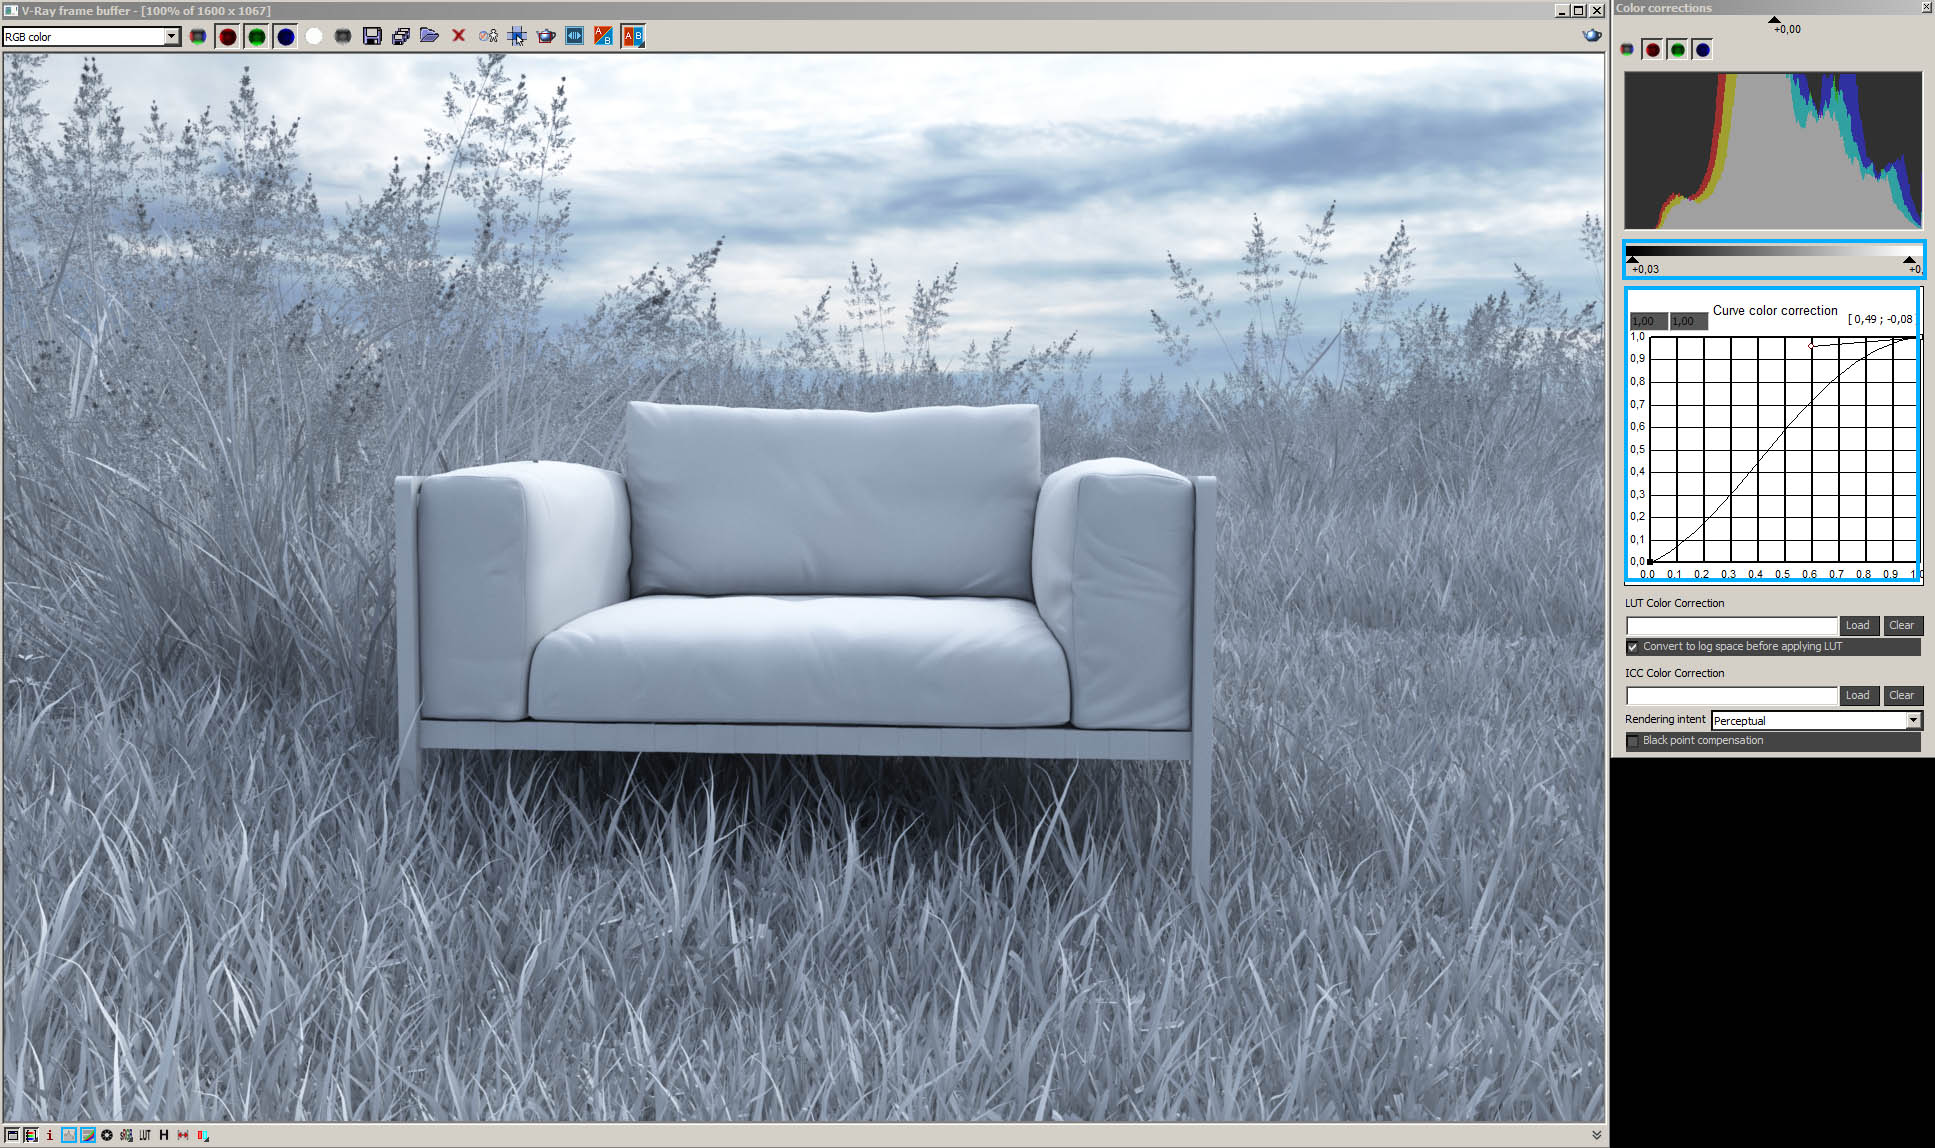
As a conclusion of what exactly we described in this article the only thing we need to adjust is Contrast! The easiest way is curves and levels inside V-Ray Frame Buffer.
1. Tribu Natal Alu Sofa : 3d model & photography by Vasilis Koutlis.
Enviornment Model: Icube.
If you want to play with a similar simple scene and test how this way could also work for you just make your effort in a really simple scene, for example with a plane and a teapot. Just be careful to select the correct EV according to the Hdri map you will use. Finally you can download the .rps file from the download link below having the same low setting with our scene.
We hope that you enjoyed our article and found it useful in some way. If you have any query please leave a comment and we will try to answer as soon as possible. Stay tuned for more 3d photography articles in the near future! Thanks for reading.